Pages

Saturday 30 April 2016

Masking - April Clarity Challenge


Here's my card - very last minute - I'll be back for the step by step later!

Clarity Challenge 38

Right, time to add the step by step!

I started with 7x7 stencil card, and marked out a square in pencil, 2cm in from the edge. I also marked the centre of each edge.

I could then use these marks to position the first stamp on each side. I used the petals from the butterfly and petal set, and black permanent ink.

Then time to cut the first masks from sticky notes. I'm glad they're a simple shape, I'll have a lot to do!

Once the masks are in place, I mark halfway between the stamp and the corners, and use this mark to position the second petal stamp, the flowers.


Eight more masks, then I can fill in the final stamp, the swirls.

Then eight more masks to cover the whole frame, and the outside of the frame as well.

At this point I stamped my main image into the centre of the card. I'm using the daydreamer stamp.


It didn't come out completely. I thought it was just me, but at the workshop last weekend I found out that the permanent ink I use, StazOn, is very quick drying so can be hard to stamp with. I suspect my pad getting dry too. So I'll treat myself to an Archival ink pad at some point.

I'd also like to try using this stamp with colour rather than black - one day!

I masked the central image as well, with a sticky note. Now I'm ready to start adding the colour. I used distress inks - mustard seed, picked raspberry and peacock feathers - with the stencil brushes. 


Where the colours overlap I get orange, purple and green, so a full rainbow. The daydreamer stamp is so summery, these bright beach wear colours seem to suit it to me!

I wanted to grunge up the colour a bit, although I was a bit nervous about ruining it as at this point I didn't have time to start again! But I decided to go for it! I spritzed my blending mat with water, and pressed the card into it - with the masks still in place. I blotted immediately with paper towel.

It was quite subtle, but added a bit of texture.


Time to add some detail to the central image. I brushed a little green (made by mixing the mustard seed and peacock feathers) around the grasses and tree. I added a sun using a mask cut from a sticky note with a die. I used a blending tool, with mustard seed ink and a touch of spiced marmalade.


I decided I wanted to ink around the outside of the frame, so added the masks back. I used the same colours as inside, but reversed the positions.


Just the finishing touches remain. I used a black pen to outline the central square, and to touch up the stamped images where they were a bit faded.

I used a black sharpie to edge the card, then mounted onto an 8x8 card blank.


And as a bonus, here's the scrap that mopped up all the spare ink from my blending mat.


PS. After I'd posted it, I decided it needed a little something on the corners - so used a black pen again to add tassels.


With hindsight I could have gone bigger!


A blue bird for Bethany

Decoupaged birdhouse with knitted bird

The April challenge at Berkhamsted Creative Challenge is All Creatures Great and Small. 


Which gave me a good excuse to complete a project for Bethany which, if I'm honest, was supposed to be a Christmas present.

It all started with a wooden decorative bird house I found in a charity shop. Bethany loves birds (va va's) so I thought it'd be great decorated in her room.

It came as plain wood, although I didn't get a picture of that.

I started with a coat of gesso to prime the wood a bit and give a light under colour.

Wooden birdhouse with coat of gesso

I then repainted the roof in blue to match the paper I wanted to add. With all those grooves I was bound to miss a bit, and if the undercoat was the same base colour it wouldn't show nearly as much.

Wooden birdhouse with coat of gesso and blue roof

I then decoupaged the birdhouse, using deco patch papers. I've had these a while, I can't even remember what the blue was bought for (I know the white I used on the picture frame that was the first thing I ever decoupaged). 

I use a water and PVA mix - it gives a nice matt finish that I like. I've never tried the varnishes you can buy specifically for decoupage, so can't say if they're better, or just different - one day I'll want a gloss finish, or do something for outside, then I'll splash out on the proper stuff.

Wooden birdhouse with coat of gesso and blue decoupaged roof

I tore the paper into pieces, but also made use of the straight edges of the paper, for the edges where the two different papers met.

For the bird, I used a pattern I downloaded from Ravelry, called the Bluebird of Happiness. It's a good, easy to follow pattern, quite simple but fiddly, using double ended needles for something so small.

I had a blue mix yarn, again, no idea what I bought it for, but I did use it to make a squid for hubby last year.


Cat investigating decoupaged birdhouse and knitted bird


Even the cat was showing some interest !

Three card birdhouses in different shapes


And, as Berkhamsted Arts and Crafts has got a variety of birdhouse shapes in that I couldn't resist, Bethany will have a little village, and a flock of birds, to adorn her room.

Friday 29 April 2016

Metal circles


Just a quick one tonight.

The 52 Christmas Card Throwdown Challenge for the week is to use metal embellishments.


I don't have a lot, but a rootle through my upstairs craft cupboard turned up a metal snowflake and a candy cane. I went with the snowflake.

I teamed it with design papers in shades of blue, from a pack from Anita's Craft. The circles were die cut - another circle card this month!

I added white glitter to the third layer, for a bit of interest. The square base layer is edged in navy sharpie - using the trick I learnt at last weekend's workshop, to make it look like an extra layer without using another sheet of card.

Finally a navy ribbon to suspend the metal snowflake, and a triple bow to embellish.

Very simple and quick this week! The end of the month means lots of deadlines so I have other projects I need to complete by tomorrow!

Saturday 23 April 2016

A crafty day away

A treat for me today, as I got to spend the whole day crafting at a Clarity workshop with Angela, one of their design team, down near Reading.

We made 4 cards, mostly using a Japanese style Clarity stamp set.

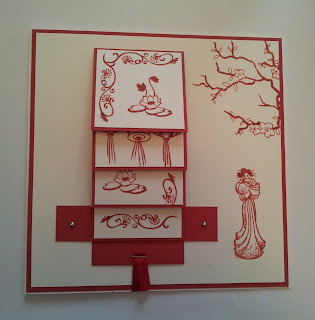
Red and white Japanese style waterfall card


This is the first, a waterfall card that unfolds to reveal the lower panels, with the greeting on the last one.It's easier than it looks - and now I have instructions and measurements!
Red and white Japanese style waterfall card (partially unfolded)

Red and white Japanese style waterfall card (unfolded)
Don't look to closely, but after I took the first photo, I splashed my drink onto the card, smudging it a bit. I have some spare card so I can redo the damaged bits at home.


The next card used a bigger version of the geisha stamp.

Black and white embossed geisha card

It's simple but effective. The images are stamped in watermark ink and heat embossed with white powder. The hills are shaded with white pencil, to ground our lovely lady. The white mat is edged in black sharpie to mimic a black layer - isn't it effective! And saves on layers for postage.

After lunch we tackled a pagoda.

Pink and blue panel card with pagoda, cherry blossom and lanterns

The images were stamped and masked - good practice for this month's Clarity challenge, which has a masking theme.

The panel was created with masking tape, and distress ink swept over with stencil brushes. I used salty ocean and picked raspberry; others used yellow and green, or green and a pale pink, to give a completely different feel to the same card.

The pagoda, lanterns and blossom were coloured in with pencils, and the panel edged with a black micron pen. Again, we used a sharpie to edge the piece.

The final card of the day used a different stamp set - the wild grasses, which are on my wish list.

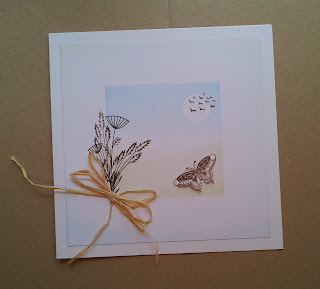
Grasses and butterfly card with raffia bow

The first step was to brush in the background, using a square aperture stencil.

The birds, grasses and butterfly were stamped in brown. We stamped a second butterfly onto a spare piece of card, and cut it out (I even did the antennae!) then layered up.

We dry brushed the edge of the card in the same colours as the centre, but reversed. The final step was a raffia bow on the corner.

It's subtle but pretty - I think this is my favourite card of the day.

Thanks to Angela and the other lovely ladies for a very enjoyable and productive day! I look forward to joining you again soon.

Friday 22 April 2016

Christmas Foliage


For this week's 52 Christmas Card Throwdown Challenge, I have made a card that is impossible to photograph! This was about the best of many photos that I took trying to get a realistic image. So I'll have to ask you to indulge me with a bit of imagination on this one.

The theme is Christmas Foliage.


I decided that I wanted to avoid the very green card that this theme suggests, so had a play with a holly embossing folder from Tattered Lace, glycerin and mica powders.

I applied the glycerin to the folder with a brayer, then put it through the Grand Calibur with kraft card. Then I added mica powders, the idea being that they'd stick where to the glycerin was applied in the deboss, but not in the raised areas.

Well, it didn't quite go like that! The glycerin was a bit patchy, and the mica powder also stuck to the rest of the kraft card. So the results were a lot more grungy that I'd hoped.

I tried different colour combinations, and using the emboss and boss sides of the folder. I also put through some Centura Pearl card as well - the mica powder spread everywhere even more with that!


This was the selection of patterns I ended up with.

Rather than pick one for a background, I thought I'd go with a selection to make up a pattern. I chose 6, and cut a corner to around 60 degrees on each - they weren't exact, so the final sheet was measured against the others to fit.


Then, using part of an adhesive sheet underneath them, I arranged them into a circle.

I then cut it back to a square to fit on my card, with the meeting point in the middle. I have quite a lot of waste, so I might be able to make a second background with the left over pieces as well.

For a topper, I used a Spellbinders holly wreath die. I cut it in kraft card and centura pearl, using the kraft card as a shadow for depth.


Then for the centre, I cut a little tag in kraft card and stamped "NOEL" in permanent ink. I used an alphabet set from my local craft shop, which has really a really fun font.


To attach the tag I used a curl from a wreath I'd cut that had torn. The tag is on foam pads to lift it.


I used foam pads for the wreath as well.

The background is layered flat onto kraft card, then I used foam tape to attach it to the 6x6 card base.


And this is where the issues began - trying to get a photo with the shine of the mica that doesn't wash out the colours.


I tried different places in the house, different camera settings, different angles - none really did it justice.


But hopefully you get the idea!


A Christmas foliage card, that's not green - at least not totally green!


Friday 15 April 2016

Vellum Circles

Christmas Card with white and gold vellum circles and sequins

Another week, another 52 Christmas Card Throwdown Challenge. It's a colour challenge this week, white and metallic gold.


52 CCT Colour Challenge - White and Metallic Gold

It's an easy challenge in some ways, it's obviously Christmassy, but then you have to narrow down the options, and try to find something interesting to do.

I tried to get my card done early this week, as I've been away at my mum's since Wednesday - I nearly managed it!

I decided to use a pack of vellum sheets, with gold Christmas patterns on, that I've had for ages. I selected sheets with small designs on, some were mostly gold, some mostly white. Then I cut circles (again - must do a different shape at some point!) with dies. As the vellum is so thin I could cut through all the sheets at once, so it was nice and quick.

I then arranged them over the card - I was trying to achieve a bokeh type effect, using translucence on the vellum where they overlapped.


White and gold vellum circles over a white vellum background

The first layout was on a white background, with another sheet from the vellum pack. It didn't quite work, so I tried a gold background - which I liked better.


Gold card square with gold vellum circles covering it

I started with a layer of the more gold circles, attached with glue dots...


Christmas Card with white and gold vellum circles overlapping the edge

...then added the white circles over the top, overlapping.

You can see I also added the word "Joy" to one of the circles, to give a focal point. I stamped in gold pigment ink then heat embossed in gold.

I thought about leaving the circles overlapping the edge, but in the end decided to trim it back.


Christmas Card with white and gold vellum circles

This is where I got to on Tuesday night, before coming away. I like it, but have the usual issue with vellum or parchment, that the glue dots show!

So, I scoured the local shops here in the New Forest for something to add. I was going for white gems, but didn't find any big enough. So instead, I got gold sequins - maybe not what I'd have used at home, but actually, I quite like the effect - adds to the glittery, out of focus feel.


Christmas Card with white and gold vellum circles and sequins

Christmas Card with white and gold vellum circles and sequins


I'm not sure I've quite pulled off the bokeh effect, but I'll live with that. I think the design is attractive nonetheless, a bit different but undeniably Christmassy. Maybe one for a man's card (despite the sequins!).


Sunday 10 April 2016

Groovi circles


Lots of circles at the moment.

This card is my first attempt at using the piercing grids with the groovi system (for parchment craft). 


This is what they look like, if you're not familiar. They're drilled with hundreds of holes - one has a straight pattern, one is diagonal. You can use them with a small ball tool to emboss, or with a piercing tool to pierce holes in the parchment. They're not as easy as they look! I've got used to groovi being very forgiving, if you come out of the groove the parchment doesn't mark. With these grids, there's always hole nearby to go into if you miss the one you're aiming for!

I started the piece by writing out the name (my friend's new little boy), then used the nested squares plate to make a border and the nested circles to add, well, circles.

Then I added the patterns in the circles with the grids, embossing on the back and piercing from the front. I started with some simple patterns and got a bit more adventurous as I went. There must be thousands of possible combinations of dotty patterns you could make with these.

I added colour to the parchment with sharpie pens.

To make the background, I chose distress inks to match the colouring, and applied them to the inside of a plastic folder, cut open. I spritzed with water, smooched the ink around a bit, then put stencil card inside and pressed the ink into it. I love the results!


This is front and back of the card - I love both, I should try using two pieces of card so I get to use both in future.

I added a bit more ink and had another go with a bigger piece of card, this came out well as well, so goes in the stash.


Such a quick and easy way to make really funky backgrounds!

Some of them look like coral, so I might try adding silver fish to them one day.


Anyway, back to today's card. I finished it off by trimming the pieces to fit, and mounting the parchment with glue dots - as there are solid coloured areas I can do this without the glue showing. I used a turquoise card base to frame it and set off the colours.

It's quite bright for a baby card - not sure how that happened, wasn't intentional! - but why not? Hopefully my friend and her little boy will enjoy it.